


【第1回】Cocos2dxでマルバツゲームを作る(HelloWorld編) – Cocos2dx v4.X対応
前回、環境構築編を書きました。下記のリンクから見れます。
余談ですが、自分の自己紹介よりも内容がしっかり書かれているせいかゴーストライター疑惑がサークル内でささやかれたとか…

今回は、サンプルソースコードの中を読み解いていくことをします。
くそ雑魚説明ですが、勘弁してください。
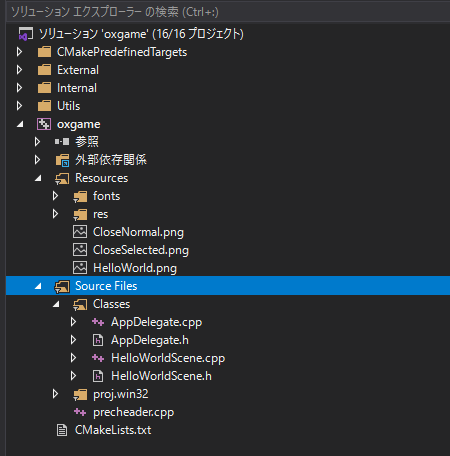
ファイル構成
まず、Visual Studioのソリューションエクスプローラを見ます。
Resources
Resources内にあるファイルはゲーム内で使う素材が格納してあります。
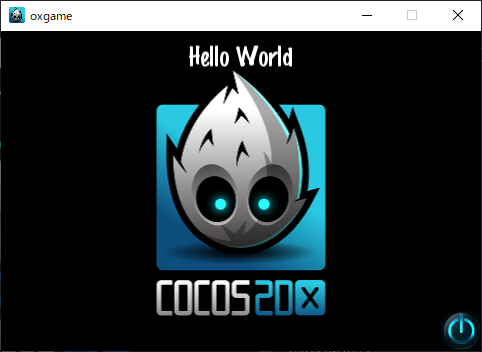
例えば、HelloWorld.pngはデモ画面の真ん中に出てきたやつです。
fontsフォルダは、
- arial.ttf
- Marker Felt.ttf
上記二つのフォント素材が「.ttf」の形で格納してあります。
Source File
SourceフォルダにはClassesフォルダとproj.win32フォルダで構成されています。
主にCocos2dxで扱っていくのは、Classesフォルダです。
新規でゲーム内の画面を追加していくのはClassesフォルダに追加します。
Classesフォルダは
- AppDelegate.cpp
- AppDelegate.h
- HelloWorldScene.cpp
- HelloWorldScense.h
現在は、4つのファイルで構成されています。
Scene
ソースの説明の前に、Cocos2dxの重要な概念であるSceneについて説明します。
Sceneとは
Sceneとは ゲームに必要なSprites,Labels,Nodes,その他オブジェクトを保持するコンテナです。Sceneはゲームロジックの実行とフレームごとのコンテンツの描写を司ります。 ゲームを開始するには少なくとも一つのSceneが必要です。 これは映画のようなものだと考えることができます。Sceneはゲーム中ずっと動作をし続け、起こっていることをリアルタイムにユーザーに表示します。 ゲームでは望む数のSceneオブジェクトを作成し、それらを簡単に切り替えることができます。 Cocos2d-x ではscene 切り替えが実装されており、クールなエフェクトと共にscene 切り替えを行うことさえできます。
つまり、タイトル画面やメニュー画面などを、各1つのSceneとして扱うことで画面切り替えなどスムーズに行っています。Sceneの中に、画像や文字のパーツを入れることでScene内に描画ができます。
AppDelegate.cpp
AppDelegateクラスは、Applicationの初期化を行っているクラスです。つまり、アプリケーション起動時の設定を行っています。
例えば、37行目付近の下記のコードは、width:480,height:320の画面解像度の設定を行っています。
//37行目付近
static cocos2d::Size designResolutionSize = cocos2d::Size(480, 320);
初めに起動されるシーンは、111行目付近に書かれています。
    //111行目付近
  // create a scene. it's an autorelease object
    auto scene = HelloWorld::createScene();
    // run
director->runWithScene(scene);Helloworldのシーンをcreateして、runWithSceneに設定するとHelloWorldのSceneが起動します。
ゲームの初めの画面は、AppDelegate.cppのこの部分を変更すればいいことになります。
デバッグ表示を消す
画面左下に出ているGL vertsやFPSなどの表示の有無は、AppDelegate.cppで記述できます。
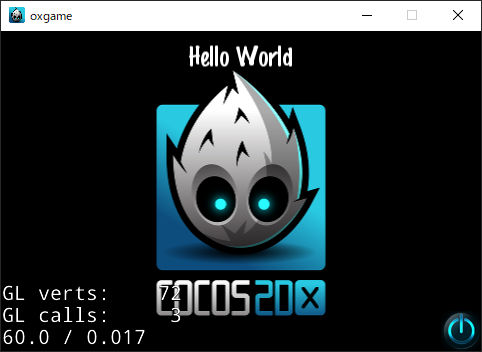
64行目のsetDisplayStatsをtrueにすると表示され、falseにすると非表示になります。
    //64行目くらい
  // turn on display FPS
    director->setDisplayStats(true);
falseの例
    //64行目くらい
  // turn on display FPS
    director->setDisplayStats(false);
FPS表示がなくなりました。
HelloWorldScene
HelloWorldScene.h
HelloWorldSceneのヘッダーです
class HelloWorld : public cocos2d::Scene
{
public:
    static cocos2d::Scene* createScene();
    virtual bool init();

    // a selector callback
    void menuCloseCallback(cocos2d::Ref* pSender);

    // implement the "static create()" method manually
    CREATE_FUNC(HelloWorld);
};
#endif // __HELLOWORLD_SCENE_H__
cocos2d::Sceneを継承しています。Sceneを作る際は、cocos2d::Sceneクラスを継承してください。
class HelloWorld : public cocos2d::SceneHelloWorldSceneクラスをインスタンス化する関数です。
static cocos2d::Scene* createScene();仮想関数initが定義されています。Sceneの初期化を定義します。
virtual bool init();CloseボタンのCallBack関数を定義しています。
void menuCloseCallback(cocos2d::Ref* pSender);Cocos2dxのマクロです。static create()メソッドを自動生成します。独自クラスを作成する場合、とりあえずつけましょう。
CREATE_FUNC(HelloWorld);HelloWorldScene.cpp
USING_NS_CCはcocos2dxのnamespaceがdefineされています。
直すとusing namespace cocos2dこんな感じ
ヘッダーで定義したcreateSceneを記述しています。create()を返してるだけです。
#include "HelloWorldScene.h"
USING_NS_CC; //using namespace cocos2d;
Scene* HelloWorld::createScene()
{
    return HelloWorld::create();
}
HelloWorld::init
bool HelloWorld::init()
{
    //////////////////////////////
    // 1. super init first
    if ( !Scene::init() )
    {
        return false;
    }
    //width : 480 height : 320
    auto visibleSize = Director::getInstance()->getVisibleSize();
    //x : 0, y : 0
    Vec2 origin = Director::getInstance()->getVisibleOrigin();
    /////////////////////////////
    // 2. add a menu item with "X" image, which is clicked to quit the program
    //    you may modify it.
    // add a "close" icon to exit the progress. it's an autorelease object
    auto closeItem = MenuItemImage::create(
                                           "CloseNormal.png",
                                           "CloseSelected.png",
                                           CC_CALLBACK_1(HelloWorld::menuCloseCallback, this));
    if (closeItem == nullptr ||
        closeItem->getContentSize().width <= 0 ||
        closeItem->getContentSize().height <= 0)
    {
        problemLoading("'CloseNormal.png' and 'CloseSelected.png'");
    }
    else
    {
        float x = origin.x + visibleSize.width - closeItem->getContentSize().width/2;
        float y = origin.y + closeItem->getContentSize().height/2;
        closeItem->setPosition(Vec2(x,y));
    }
    // create menu, it's an autorelease object
    auto menu = Menu::create(closeItem, NULL);
    menu->setPosition(Vec2::ZERO);
    this->addChild(menu, 1);
    /////////////////////////////
    // 3. add your codes below...
    // add a label shows "Hello World"
    // create and initialize a label
    auto label = Label::createWithTTF("Hello World", "fonts/Marker Felt.ttf", 24);
    if (label == nullptr)
    {
        problemLoading("'fonts/Marker Felt.ttf'");
    }
    else
    {
        // position the label on the center of the screen
        label->setPosition(Vec2(origin.x + visibleSize.width/2,
                                origin.y + visibleSize.height - label->getContentSize().height));
        // add the label as a child to this layer
        this->addChild(label, 1);
    }
    // add "HelloWorld" splash screen"
    auto sprite = Sprite::create("HelloWorld.png");
    if (sprite == nullptr)
    {
        problemLoading("'HelloWorld.png'");
    }
    else
    {
        // position the sprite on the center of the screen
        sprite->setPosition(Vec2(visibleSize.width/2 + origin.x, visibleSize.height/2 + origin.y));
        // add the sprite as a child to this layer
        this->addChild(sprite, 0);
    }
    return true;
}Director::getInstance()->getVisibleSize()でゲームの画面解像度を取得します。
今回は、width:480,height:320を設定したため、width:480,height:320のcocos2dx::SizeがvisibleSizeに入ります。
//width : 480 height : 320
auto visibleSize = Director::getInstance()->getVisibleSize();
MenuItemImage
MenuItemImageはメニューのアイテムを作成することができます。Sampleページでは、電源ボタンみたいなものがメニューとして使用されています。
auto closeItem = MenuItemImage::create(
                                           "CloseNormal.png",
                                           "CloseSelected.png",
CC_CALLBACK_1(HelloWorld::menuCloseCallback, this));- 第1引数 : 通常表示の画像
- 第2引数 : 選択状態の画像(クリックなど)
- 第3引数 : クリックした際のイベント関数
を指定します。
static MenuItemImage* create	(
    const char * 	          normalImage,
    const char * 	          selectedImage,
    const ccMenuCallback & 	callback
) closeItemの位置をcloseItem->setPosition(Vec2(x,y));で決めています。
xは、画面解像度のwidith(480)からcloseItemの横幅/2を引いた値になります。
yは、closeItemの縦幅/2の値です。
これは、closeItemのアンカーが中央に設定しているため、画面右はじに表示するには、縦横半分の値を設定するとすべて表示できるからです。
    if (closeItem == nullptr ||
        closeItem->getContentSize().width <= 0 ||
        closeItem->getContentSize().height <= 0)
    {
        problemLoading("'CloseNormal.png' and 'CloseSelected.png'");
    }
    else
    {
        float x = origin.x + visibleSize.width - closeItem->getContentSize().width/2;
        float y = origin.y + closeItem->getContentSize().height/2;
        closeItem->setPosition(Vec2(x,y));
    }
Menu
Menuはメニューを作成します。MenuItemで作成されたものをMenuに追加することで表示できます。
this->addChild は、Sceneの中に登録するメソッドです。第2引数は、zorderで描画の順番を指定できます。
    // create menu, it's an autorelease object
    auto menu = Menu::create(closeItem, NULL);
    menu->setPosition(Vec2::ZERO);
this->addChild(menu, 1);Label
Labelでは、画面上に文字を表示することが可能です。
サンプルでは、「HelloWorld」に当たるところです。
createWithTTFは、TTFを指定できるため、様々なフォントが使用できます。(Resourceのfontに入れてください。)
label->setPosition で画面の表示位置を決めています。
this->addChild で忘れずSceneに追加
auto label = Label::createWithTTF("Hello World", "fonts/Marker Felt.ttf", 24);
    if (label == nullptr)
    {
        problemLoading("'fonts/Marker Felt.ttf'");
    }
    else
    {
        // position the label on the center of the screen
        label->setPosition(Vec2(origin.x + visibleSize.width/2,
                                origin.y + visibleSize.height - label->getContentSize().height));
        // add the label as a child to this layer
        this->addChild(label, 1);
    }
Label::createWithTTF : https://cocos2d-x.org/reference/native-cpp/V3.0alpha0/db/de4/classcocos2d_1_1_label.html#a4b8d92bbcba3dead7b1373b5865fe13c
Sprite
Spriteでは、画面上に画像の表示が行えます。
サンプルでは、画面真ん中のCocos2dxのロゴマーク?がSpriteに当たります。
Labelと同じく、
setPositionで画面の表示位置を決めています。
this->addChild で忘れずSceneに追加
    auto sprite = Sprite::create("HelloWorld.png");
    if (sprite == nullptr)
    {
        problemLoading("'HelloWorld.png'");
    }
    else
    {
        // position the sprite on the center of the screen
        sprite->setPosition(Vec2(visibleSize.width/2 + origin.x, visibleSize.height/2 + origin.y));
        // add the sprite as a child to this layer
        this->addChild(sprite, 0);
    }
完成
最終的に以下の画面が出来上がります。
次回は、タイトル画面を作成していきます。
次回はこちら


コメント