- 概要
- 前提条件
- パッケージインストール
- Stable Diffusionダウンロード
- モデルダウンロード
- 起動
- モデルの変更
- modules.devices.NansException: A tensor with NaNs was produced in Unet. This could be either because there’s not enough precision to represent the picture, or because your video card does not support half type. Try setting the “Upcast cross attention layer to float32” option in Settings > Stable Diffusion or using the –no-half commandline argument to fix this. Use –disable-nan-check commandline argument to disable this check.
概要
「Apple Silicon(M1/M2 Mac)でStable Diffusion Web UIをインストールする方法を徹底解説。AI画像生成ツール「Stable Diffusion」をMacのM1/M2チップに最適化した環境でセットアップし、スムーズに利用するためのステップを詳しく紹介。手順を追うことで、パフォーマンス向上や安定性を確保し、Macユーザーでも簡単に高品質な画像生成が可能になります。」
前提条件
Homebrewをインストールすることが前提です
ターミナルで以下のコマンドを実行してください
/bin/bash -c "$(curl -fsSL https://raw.githubusercontent.com/Homebrew/install/HEAD/install.sh)"パッケージインストール
Macのターミナルで以下のコマンドを実行します
brew install cmake protobuf rust [email protected] git wgetStable Diffusionダウンロード
以下のコマンドでStable Diffusionのプロジェクトファイルをダウンロードします
git clone https://github.com/AUTOMATIC1111/stable-diffusion-webui
cd stable-diffusion-webui
モデルダウンロード
Stable Diffusionのモデルをダウンロードします
公式では以下のモデルを配布しています
- Stable DIffusion 1.4 (sd-v1-4.ckpt)
- Stable Diffusion 1.5 (v1-5-pruned-emaonly.safetensors)
- Stable Diffusion 1.5 Inpainting (sd-v1-5-inpainting.ckpt)
Stable Diffusion 2.0と2.1は、モデルと設定ファイルの両方が必要で、画像を生成する際に画像の幅と高さを768以上に設定する必要があります
今回は「v2-1_768-ema-pruned.ckpt」をダウンロードしました
ダウンロードしたものを「models」の「Stable-diffusion」に「v2-1_768-ema-pruned.ckpt」を保存します
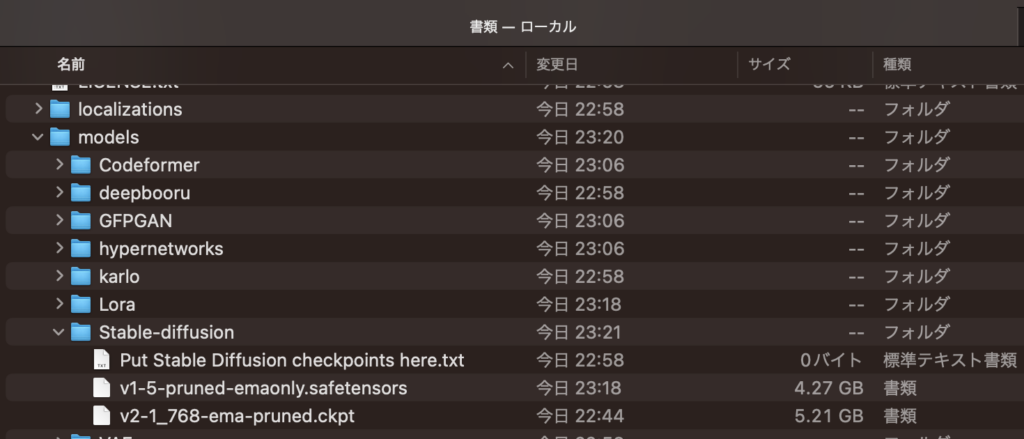
ターミナルで以下のコマンドを実行させます
cd models/Stable-diffusion
wget https://raw.githubusercontent.com/Stability-AI/stablediffusion/main/configs/stable-diffusion/v2-inference-v.yaml
「v2-inference-v.yaml」をダウンロードしたモデル名に変更します。
例えば、「v2-1_768-ema-pruned.ckpt」をダウンロードしたら、「v2-inference-v.yaml」を「v2-1_768-ema-pruned.yaml」に変更します。
以下のコマンドでファイル名を変更できます
mv v2-inference-v.yaml v2-1_768-ema-pruned.ckpt以下のような構成になると思います
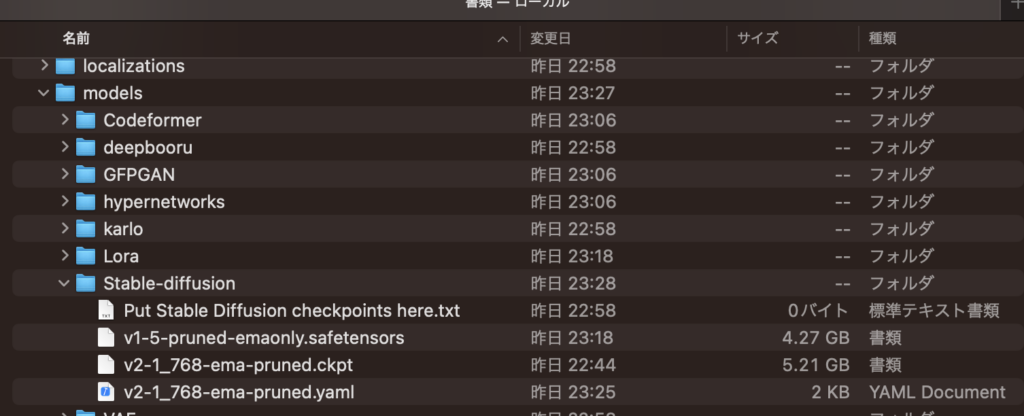
ディレクトリを移動したので以下のコマンドでStable Diffusionのプロジェクト直下に戻ります
cd ../../起動
web uiの表示は以下のコマンドで行います
./webui.sh以下は実行結果です
stable-diffusion-webui % ./webui.sh

################################################################
Install script for stable-diffusion + Web UI
Tested on Debian 11 (Bullseye), Fedora 34+ and openSUSE Leap 15.4 or newer.
################################################################

################################################################
Running on admin user
################################################################

################################################################
Repo already cloned, using it as install directory
################################################################

################################################################
Create and activate python venv
################################################################

################################################################
Launching launch.py...
################################################################
Python 3.10.16 (main, Dec  3 2024, 17:27:57) [Clang 15.0.0 (clang-1500.1.0.2.5)]
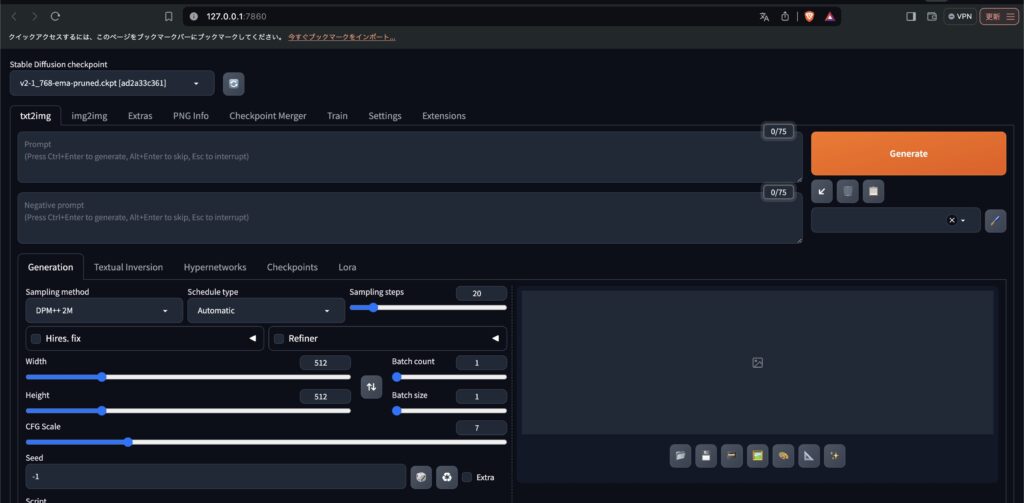
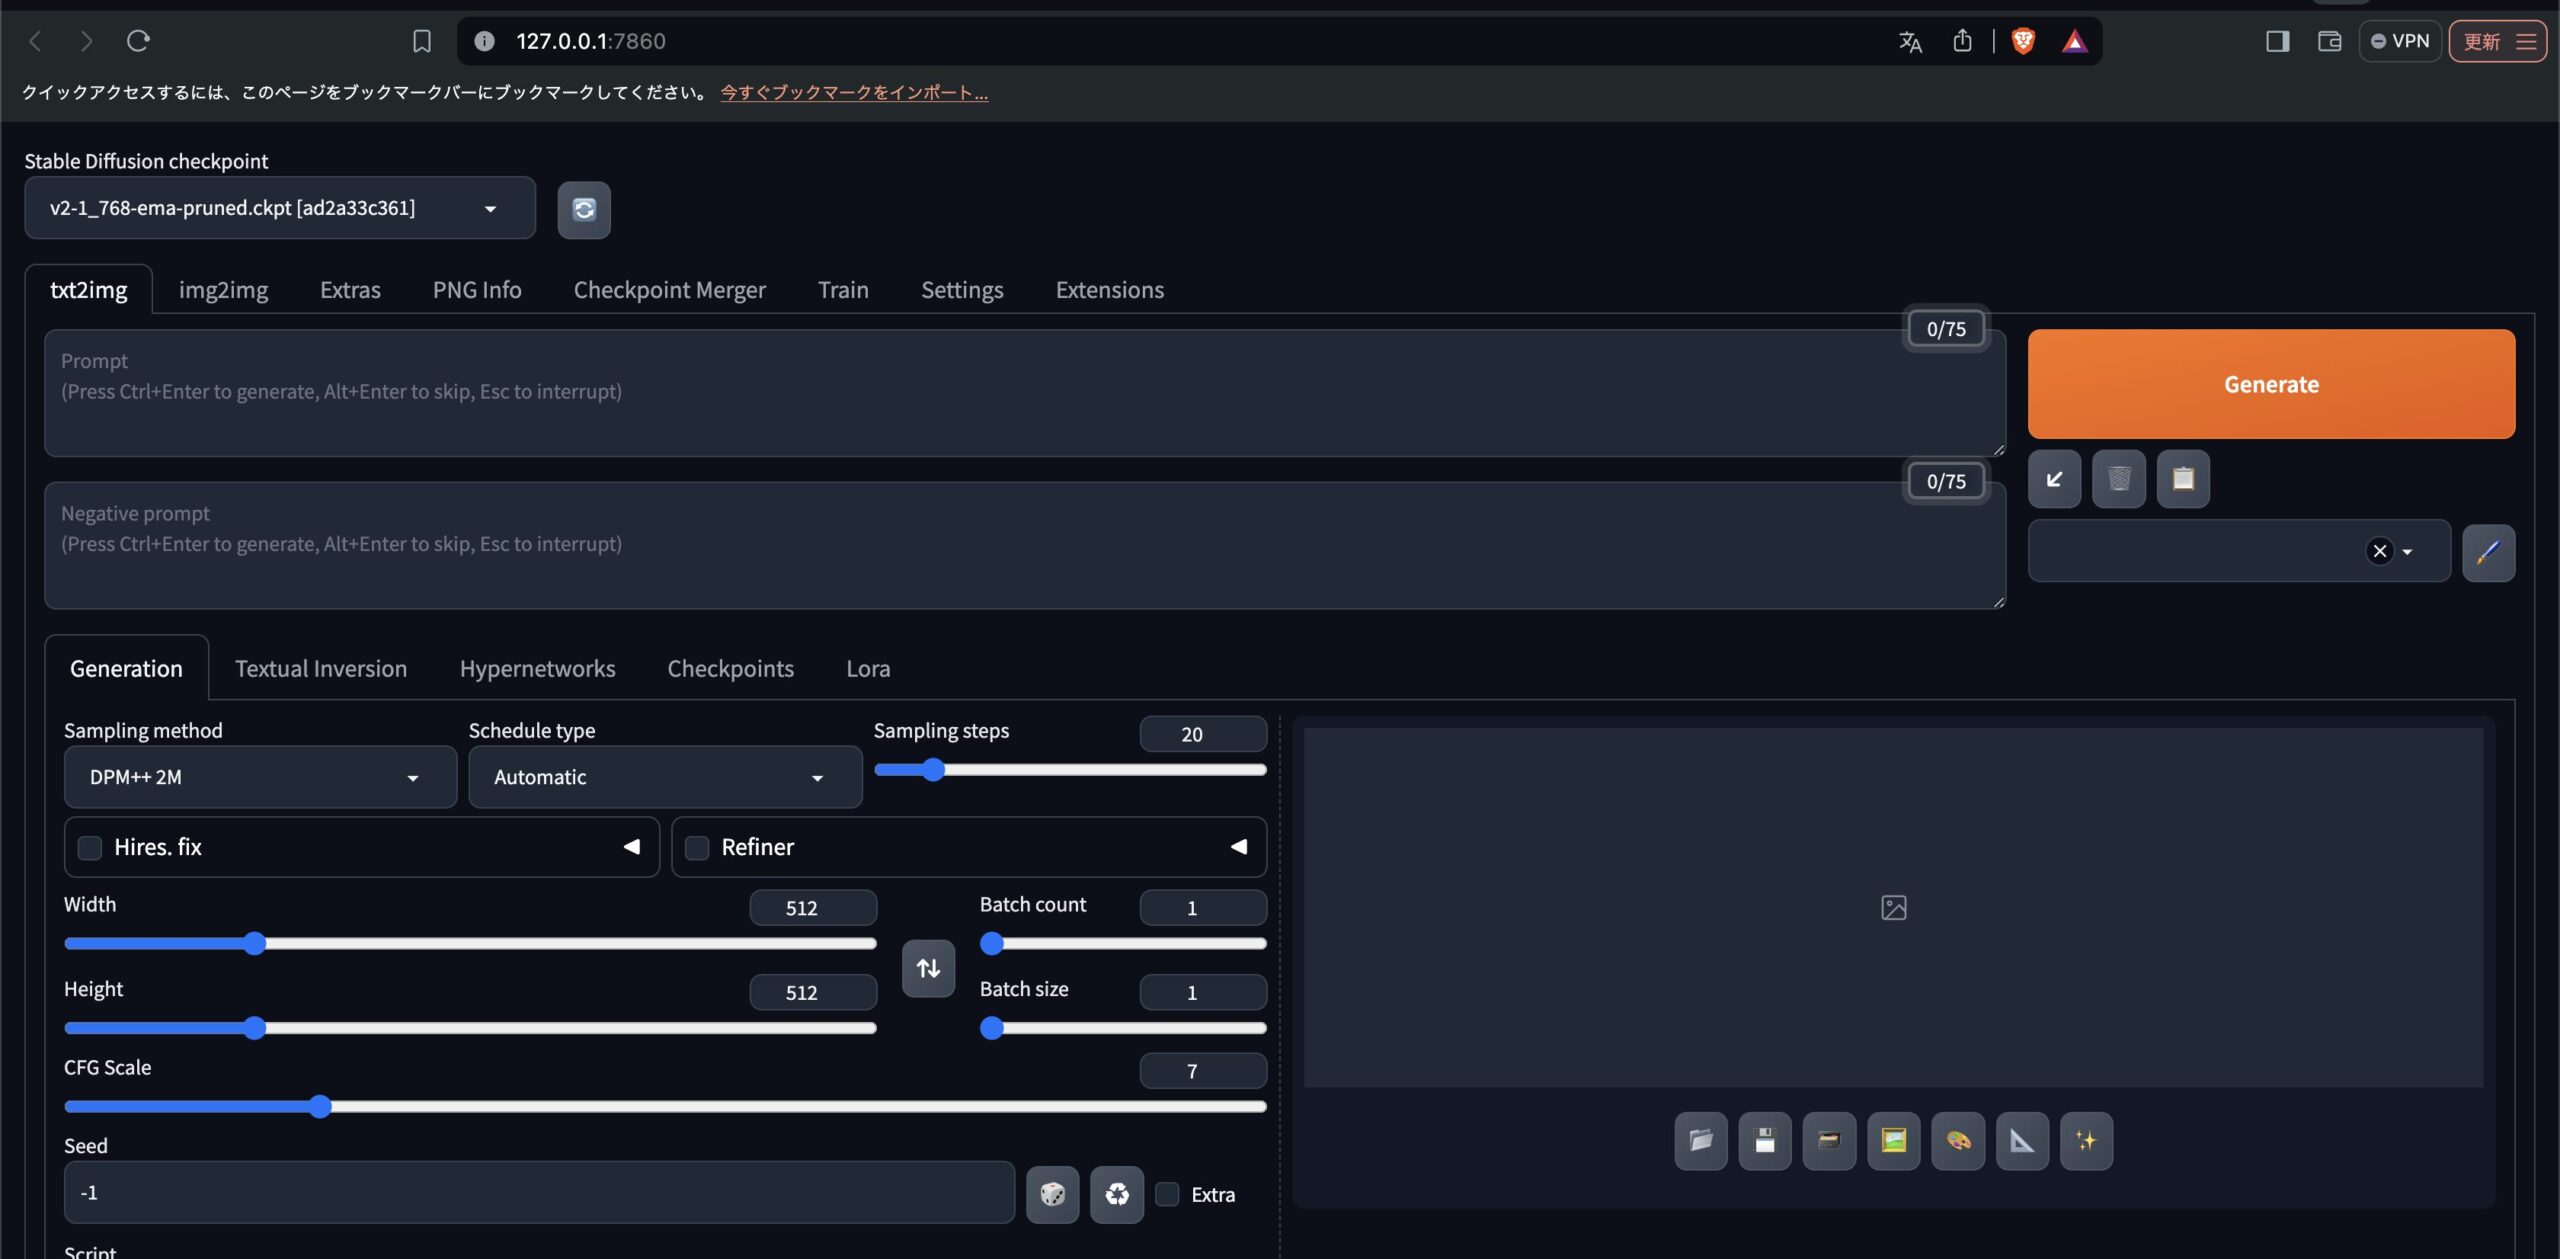
起動するとブラウザが立ち上がり以下の画面が表示されると思います
モデルの変更
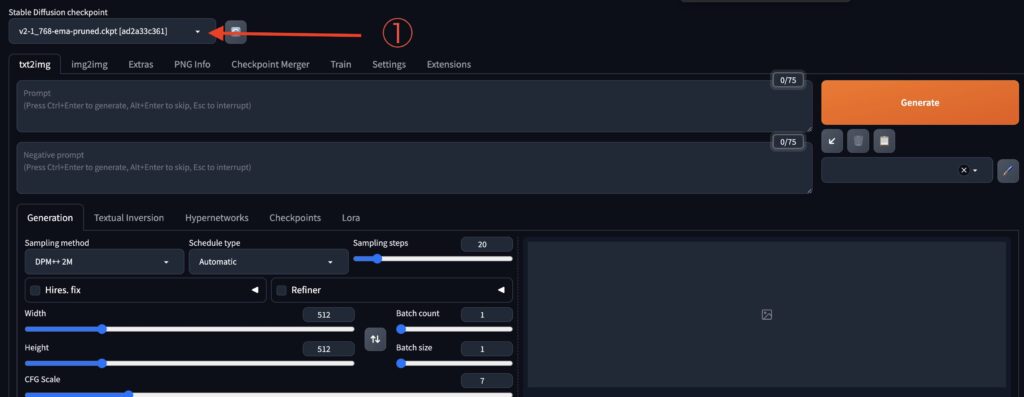
モデルの変更は、以下の画像の「①」をクリックするとモデルの一覧が表示されます。
モデルを選択すると読み込みが始まります
modules.devices.NansException: A tensor with NaNs was produced in Unet. This could be either because there’s not enough precision to represent the picture, or because your video card does not support half type. Try setting the “Upcast cross attention layer to float32” option in Settings > Stable Diffusion or using the –no-half commandline argument to fix this. Use –disable-nan-check commandline argument to disable this check.
「Generate」を実行した際、以下のエラーが表示される場合があります
modules.devices.NansException: A tensor with NaNs was produced in Unet. This could be either because there's not enough precision to represent the picture, or because your video card does not support half type. Try setting the "Upcast cross attention layer to float32" option in Settings > Stable Diffusion or using the --no-half commandline argument to fix this. Use --disable-nan-check commandline argument to disable this check.Web UIの
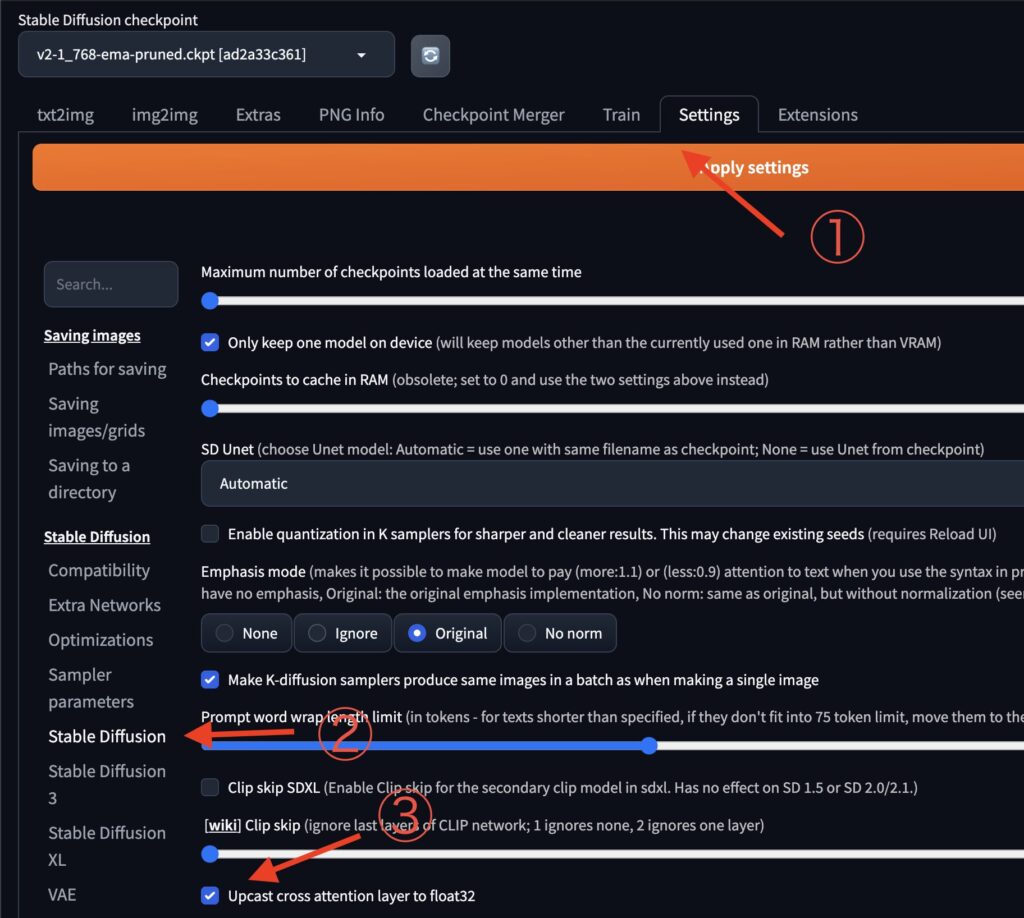
①「Settings」をクリック
②「Stable Diffusion」をクリック
③「Upcast cross attention layer to float32」にチェックを入れる
④最後に、「Apply settings」をクリックして保存します









コメント